iBirdFeeder – Part II – Raspberry Pi software
Every project is always a bit more exciting when you can learn something new on the way, the more you can learn the better. I have tried to build the whole software infrastructure around MQTT protocol with use of several AWS services.
Programming Raspberry PI itself it pretty straight forward and consist of:
- Installing required libraries on the RPi itself
- Setting up communication with the AWS Internet Of Things web service
- Triggering photo capture when the motion is detected by the PIR sensor
- Reading and sending the temperature sensor data periodically
- Responding to incoming commands
- Taking and processing photos
- Resizing images
- S3 Upload
- Running the feeder pipe transporter
To find out which pins you should connect and where you should look into the configuration of the Raspberry Pi python script
aws_access: your_aws_access_key
aws_secret: your_aws_secret
bucket_name: birdfeeder001
[LOGGING]
log_file: birdfeeder.log
[IOT]
command_topic: command
temperature_topic: temperature
image_created_topic: image_created
video_created_topic: video_created
take_photo_cmd: take_photo
record_video_cmd: record_video
feed_cmd: feed
temperature_cmd: temperature
temperature_status: temperature
resource_created_status: resource_created
aws_host: your_aws_iot_host.iot.eu-west-1.amazonaws.com
aws_port: 8883
client_id: BirdFeeder001
thing_name: BirdFeeder001
ca_path: /home/pi/deviceSDK/certs/root-CA.crt
cert_path: /home/pi/deviceSDK/certs/certificate.pem.crt
key_path: /home/pi/deviceSDK/certs/private.pem.key
[GPIO]
pir_pin: 20
feeder_pin: 21
[IMAGE]
small_image_prefix: small_
medium_image_prefix: medium_
small_image_width: 400
medium_image_width: 1024
The config file is divided into sections, each responsible for properties specific to some functionality. The GPIO sections specifies the pins used by pir sensor (input) and feeder pin (output). The temperature sensor is connected to standard 1-wire pins of the Raspberry Pi. The RPi pins have enough available VCC and GND pins to connect all the external devices (temp + pir sensor). The camera module goes into custom connector.
Pin layout for Raspberry Pi 3:

Installing required libraries on the RPi itself
To upload to s3 you need to install python boto module: apt-get install python-boto, create a separate user for amazon s3 services so you will operate with a separate credentials for RPi only.
In addition create an s3 bucket for image uploads. The ‘paho’ library is used for MQTT communication, ‘boto’ for s3 uploads and ‘w1thermsensor’ for easy temperature readings from DS18B20 1-Wire sensor.
sudo apt-get upgrade
sudo apt-get install python3-pip
sudo pip-3.2 install paho-mqtt
sudo pip-3.2 install boto
sudo pip-3.2 install w1thermsensor
Setting up communication with the AWS Internet Of Things web service
You can find multiple tutorials on how to get started with AWS IoT service, I won’t go into detail of creating a ‘thing’ on the service website itself as its really straight forward, one example could be found here: http://blog.getflint.io/get-started-with-aws-iot-and-raspberry-pi . The only thing you need to do is to create a single ‘thing’, create and download the certificate files and you are done (for now). Later we will create some rules which will allow us to automatically publish the messages to DynamoDB database or s3 service.
After the initial setup on AWS IoT website you need to transfer the certificate files to your Raspberry Pi and configure your .ini file appropriately. The most important section is:
aws_port: 8883
client_id: BirdFeeder001
thing_name: BirdFeeder001
ca_path: /home/pi/deviceSDK/certs/root-CA.crt
cert_path: /home/pi/deviceSDK/certs/certificate.pem.crt
key_path: /home/pi/deviceSDK/certs/private.pem.key
‘ca, cert and key_path’ are the absolute path to your certificate files location downloaded from the AWS IoT website. ‘thing_name’ and ‘client_id’ is the name you gave to your ‘thing’ where you were creating it on the website. the port is standard and host can be found on the left side of the configuration screen.

Once the setup is created we can try to send messages between AWS IoT and the Raspberry Pi (Assuming you are already connected either through WiFi or ethernet to the internet on the RPI itself).
mqttc.on_connect = on_connect
mqttc.on_message = on_message
mqttc.tls_set(caPath, certfile=certPath, keyfile=keyPath, cert_reqs=ssl.CERT_REQUIRED, tls_version=ssl.PROTOCOL_TLSv1_2, ciphers=None)
mqttc.connect(awshost, awsport, keepalive=60)
mqttc.loop_start()</pre>
<pre>## CALLBACK Functions
def on_connect(client, userdata, flags, rc):
global connflag
connflag = True
logger.info("Connection returned result: " + str(rc) )
# Subscribing in on_connect() means that if we lose the connection and
# reconnect then subscriptions will be renewed.
client.subscribe("#" , 1 )
def on_message(client, userdata, msg):
logger.info("topic: "+msg.topic)
logger.info("payload: " + "".join(map(chr, msg.payload)))
if msg.topic == COMMAND_TOPIC:
executeCommand("".join(map(chr, msg.payload)))</pre>
<pre>###
### Main loop
###
while 1==1:
sleep(3)
if connflag == True:
#### do something here
sleep(600)
else:
logger.info("waiting for connection...")
Thats the whole code for communicating with the IoT web service. Full source code of the script will be available at the end of this post. Once the connection is established the ‘on_connect’ callback method is executed which sets the boolean flag. Receiving messages from the AWS side is handled by the ‘on_message’ method. Sending messages to the AWS IoT service is as simple as using mqttc.publish method:
mqttc.publish(topic, "{"" + status + "":"" + value + ""}", qos=1)
The ‘sendStatus’ method takes the name of the topic and fills up the inline created JSON to send over to AWS IoT service for further processing.
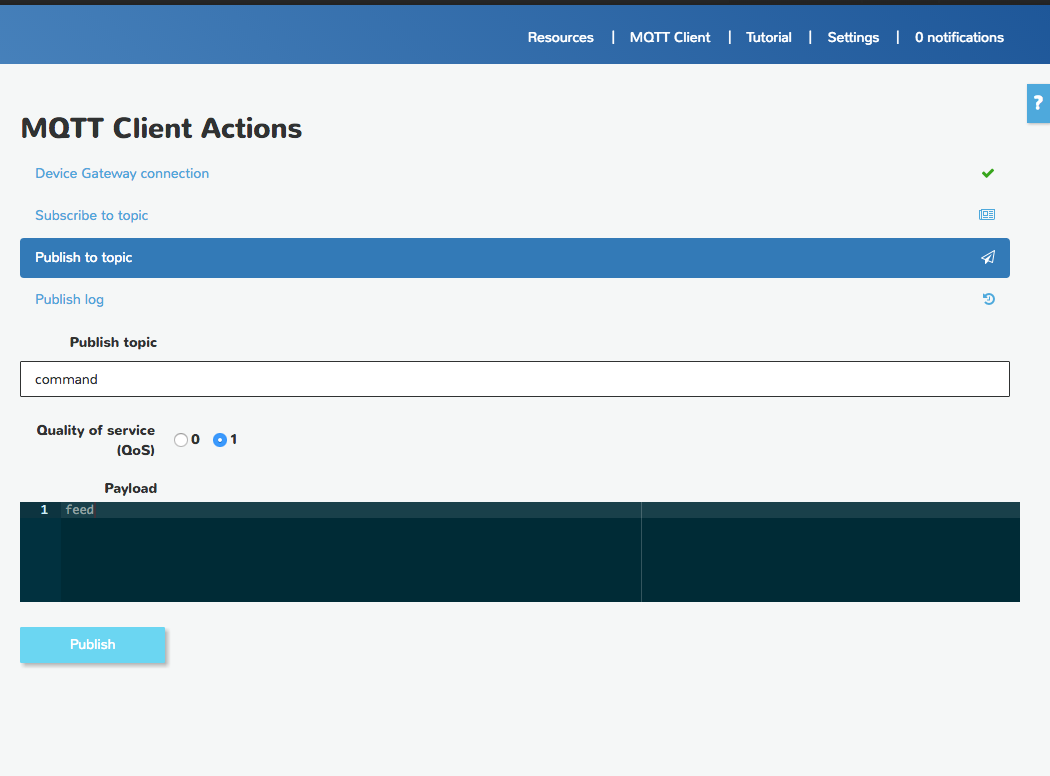
For simple testing and debugging purposes you can use MQTT client available on the AWS IoT website where you can subscribe to specific topics and send messages to your registered resources.
Triggering photo capture when the motion is detected by the PIR sensor
The PIR sensor just sets its output high when the motion is detected, its pretty simple and pretty straightforward to use. You need to configure one of the RPi pins as input pins, pull them down and attach an interrupt which will execute specified method once the pin state changes.
GPIO.setup(pirPin, GPIO.IN, pull_up_down=GPIO.PUD_DOWN)
GPIO.add_event_detect(pirPin, GPIO.RISING, callback=pirCallback, bouncetime=300)
def pirCallback(channel):
logger.info("rising edge detected")
takePhoto()
Reading and sending the temperature sensor data periodically
For reading temperature data the best way is to install already available library for DS18B20 sensor available at GitHub https://github.com/timofurrer/w1thermsensor . Before you do that tho, you would need to install One-Wire support, instructions can be found here: https://learn.adafruit.com/adafruits-raspberry-pi-lesson-11-ds18b20-temperature-sensing/ds18b20
The code itself for reading the temperature goes as follows:
def sendTemperatureReading():
temperature_in_celsius = sensor.get_temperature()
sendStatus(TEMPERATURE_TOPIC, TEMPERATURE_STATUS, str(temperature_in_celsius))
logger.info("msg sent: temperature " + "%.2f" % temperature_in_celsius )
Responding to incoming commands
Once the message is received with the ‘on_message’ callback method the simple if-else conditions are executed to find out which command should be executed further. The BirdFeeder listens actually on the single topic right now called ‘command’.
logger.info("received command: " + command)
if command == TAKE_PHOTO_CMD:
takePhoto()
elif command == TEMBERATURE_CMD:
sendTemperatureReading()
elif command == RECORD_VIDEO_CMD:
recordVideo()
elif command == FEED_CMD:
runFeeder(5)
else:
logger.info("received unknown command " + command)
As you can see from the above the bird feeder can take photo, record video and run the seed transporter (feed command). The video length is pre set to 10 seconds
Taking and processing photos
You can find already available libraries to handle the camera module easily, both the video and photo parts are pretty straightforward.
logger.info("taking photo...")
timestr = time.strftime("%Y%m%d-%H%M%S")
directory = '/home/pi/Pictures/'
img = 'image_' + timestr + '.jpg'
camera.resolution = (2592, 1944)
camera.capture(directory + img)
logger.info("creating additional image sizes...")
resize(directory, img, smallImgPrefix, smallImgSize)
resize(directory, img, mediumImgPrefix, mediumImgSize)
logger.info("uploading picture to s3 service")
upload_S3(directory, img)
upload_S3(directory, smallImgPrefix+img)
upload_S3(directory, mediumImgPrefix+img)
removeLocal(directory, img)
removeLocal(directory, smallImgPrefix+img)
removeLocal(directory, mediumImgPrefix+img)
sendStatus(IMAGE_CREATED_TOPIC, RESOURCE_CRATED_STATUS, img)
def recordVideo():
logger.info("recording video...")
timestr = time.strftime("%Y%m%d-%H%M%S")
directory = '/home/pi/Videos/'
vid = 'video_' + timestr + '.h264'
camera.resolution = (1920, 1080)
camera.rotation = 180
camera.start_recording(directory + vid)
camera.wait_recording(10)
camera.stop_recording()
logger.info("uploading video to s3 service")
upload_S3(directory, vid)
logger.info("file " + vid + " uploaded.")
removeLocal(directory, vid)
logger.info("file " + vid + " removed from local filesystem.")
sendStatus(VIDEO_CREATED_TOPIC, RESOURCE_CRATED_STATUS, vid)
Resizing images:
The images get resized while keeping their aspect ratio at the same time:
inFile = Image.open(directory + imgFile)
outFile = prefix+imgFile
xDim = inFile.size[0]
yDim = inFile.size[1]
newSize = aspectRatio(xDim, yDim, imgSize)
inFile = inFile.resize((int(newSize[0]),int(newSize[1])),Image.ANTIALIAS)
inFile.save(directory + outFile)
def aspectRatio(xDim, yDim, imgSize):
if xDim <= imgSize and yDim <= imgSize: #ensures images already correct size are not enlarged.
return(xDim, yDim)
elif xDim > yDim:
divider = xDim/float(imgSize)
xDim = float(xDim/divider)
yDim = float(yDim/divider)
return(xDim, yDim)
elif yDim > xDim:
divider = yDim/float(imgSize)
xDim = float(xDim/divider)
yDim = float(yDim/divider)
return(xDim, yDim)
elif xDim == yDim:
xDim = imgSize
yDim = imgSize
return(xDim, yDim)
S3 Upload
The created image files are uploaded to s3 using the mentioned python library for RPi and then removed from the local filesystem using another utility function and os package
def percent_cb(complete, total):
sys.stdout.write('.')
sys.stdout.flush()
def upload_S3(dir, file):
k = Key(bucket)
k.key = file
k.set_contents_from_filename(dir + file, cb=percent_cb, num_cb=10)
logger.info("file " + file + " uploaded.")
def removeLocal(dir, file):
os.remove(dir + file)
logger.info("file " + file + " removed from local filesystem.")
Running the feeder pipe transporter
Running the feeder pipe transporter is based on setting the feeder motor pin state high for the specific number of seconds (set as timeToRun variable inside the script itself):
logger.info("running feeder pipe")
GPIO.output(feederPin, 1)
sleep(timeToRun)
GPIO.output(feederPin, 0)</pre>
Entire script is available on github at: https://github.com/softberries/ibirdfeeder